Kamado Baked Bread Rolls

Yum
After a visit to the local farm shop with the family we returned home with the usual fair of meats and some nice handmade burgers which my 4 year old son demanded we have for diner that night.

And with that it was set, with the heat we have been having over the last week it made sense to fire up the grill and keep the heat of cooking out of the house, so i decided to sit in the garden enjoying the sun with an ice cold bottle of beer to help keep the heat at bay.

All was well untill my better half informed me we had no buns for the burger to go on, and the previously mentioned beer had become 2 by this point so driving to the store was out of the question, so i raided the cupboards to see what we had and made the decision to knock up a quick batch of bread i could cook on the grill and the cook the burgers after while they were cooling.

Not wanting anything too strenuous it was a simple bread recipe used the wold over for loaves that i decided i would just divide up to make bread rolls
Bread Rolls for burgers made at home
Homemade Bread Rolls


First things first as usual i got the ingredients together

The ingredients for the bread


  • 500g Strong white bread flour
  • 300ml warm water
  • 7g instant yeast
  • 1tsp of salt
  • 3 Tbsp olive oil
Next i add the yeast and the salt to the flour and mix well in the bowl, once mixed i make a well in the middle and pour into it the water and the olive oil then mix together with a spoon untill it all comes together like the below picture
Everything mixed well
Once everything has come together like above its time to lightly flour a work surface and turn the dough out onto it, i then quickly wash and dry the bowl, lightly oil it and set it aside while i knead the dough.

Kneading the dough doesn't take long about 5 to 10 minutes, as a rule i just forget about the time and keep going untill it has become silky smooth like the picture below then i know its ready 
All Kneaded and silky smooth 
Now i just put the dough in the bowl i oiled before cover with cling film and set aside for about an hour until it has doubled in size, this is best done in a warm draft free place but as i said earlier its been hot here so i just left it on my kitchen worktop
Dough in the bowl for its first proving 

Just over an hour later i came back inside to check on the dough 
Nicely risen
As you can see it had risen well so it was time to set up for the next stage.
Because i was baking on my Kamado Joe i drew around my pizza stone on some baking paper, cut it out and set it aside.
Next i floured the worktop again and turn it out and knock back the dough, to knock back its simpler than it sounds, just a case of gently and slowly kneading for 20 seconds to knock the air out of it.
Once this was done i divided the dough in to 8 and rolled them into balls and placed them on the baking paper id cut previously
All divided up
I divided them up roughly but if you want them the same just weigh the dough before you divide and the weigh each ball out equally.
I left them on the baking paper and covered with a clean dishcloth for about an hour for the second rise, which gave me time to set up the grill the same way you would for cooking pizza, with the the heat deflector in the raised position, the grill on top of this and the pizza stone on top of the grill.
I was aiming for 200c (400f approx) to cook the rolls

Around an hour later the rolls ahd risen again and it was time take them out to cook
On the pizza peel
As you can see they rolls had doubled in size and using my pizza peel i carried them outside to the grill and slid them onto the preheated pizza stone
On the pizza stone for the cook
I closed the lid and let them cook for about 20 minutes, you know they are ready when they have browned off and sound hollow if you pick one up and tap it on the bottom 

Finished Product 
When they had cooked i removed them to a cooling rack and left for at least 15 minutes to cool with a clean dishcloth over them.
A simple bread with a total "work" time of around 15 mins with the rest of the time waiting, just whats needed on a hot summers day!
And if its a loaf you want, instead of dividing into 8 just make into a round or put into a loaf tin and cook for around 5 mins longer

Homemade Coleslaw

Yum
This is something i make when i've got a spare 10 minutes and goes great with almost anything, and is easily modified to suit anyone's taste

First i sort out the vegetables by washing and peeling the below

The bulk of the recipe 

  • 1/4 red cabbage 
  • 1/4 white cabbage
  • 2 spring onions 
  • 1 medium red onion

i thinly slice the red onion and the spring onion and add to a good sized plastic tub with a tight fitting lid
next i put the 2 cabbages and the 2 carrots thru my food processor, 
the food processor i use is a kenwood all in one that has reversible blades for slicing and grating so to save on the washing up i use the same blade to slice the cabbage then flip it to grate the carrots

The blade for my food processor 
This can be done by using a cheese grater for the carrots and a good sharp knife for the cabbages altho it will obviously take a little longer 

Once everything is cut you will end up with a base like this 
Coleslaw base

Next is to mix up the dressing 

to a bowl i add
  • 1 1/2 tbsp of sugar
  • 1/4 tsp celery salt
  • 1/4 tsp salt
  • a pinch of pepper
  • 2 tbsp buttermilk
  • 1 tbsp milk
  • 1 tbsp lemon juice
  • 2 tsp dijon mustard

I then stir this mixture until the sugar has dissolved then add 
  • 8 tbsp of mayonnaise
I always use the full fat version as any "light" versions of mayonnaise just don't taste as good to me 
Ingredients mixed with mayo added
I mix the above together untill the mixture becomes smooth and lump free 
Smooth and lump free
Once that's done its a case of simply adding the dressing to the vegetables and mixing well
All mixed up!
With the lid on it will last for around 3 to 5 days in the refrigerator but does benefit from a good stir before use

And as said at the beginning this is easily modified to your own taste, if you like it thicker use more mayo, thinner use less.
Don't like red cabbage? simply use all white and its just as good
My personal favourite is to add some chilli sauce and flakes for a spicy coleslaw!  

Homemade Coleslaw

www.fire2feast.com
Homemade Coleslaw

Ingredients

  • 1/4 red cabbage
  • 1/4 white cabbage
  • 2 spring onions
  • 1 medium red onion
  • 1 1/2 tbsp of sugar
  • 1/4 tsp celery salt
  • 1/4 tsp salt
  • a pinch of pepper
  • 2 tbsp buttermilk
  • 1 tbsp milk
  • 1 tbsp lemon juice
  • 2 tsp dijon mustard
  • 8 tbsp of mayonnaise

Instructions

  1. washing and peel the vegetables
  2. thinly slice the red onion and the spring onion and add to a good sized plastic tub with a tight fitting lid
  3. put the 2 cabbages and the 2 carrots thru a food processor (or slice cabbages with a sharp knife and grate the carrots)
  4. add grated carrots and sliced cabbage to the tub containing the red onion and spring onion and mix
  5. in a bowl mix the sugar, celery salt, salt ,pinch of pepper, buttermilk, milk, lemon juice and dijon mustard and stir well untill the sugar has dissolved
  6. next add the mayonnaise and mix together untill the mixture becomes smooth and lump free
  7. finally add the dressing to the vegetables and mix well
Prep Time: 00 hrs. 15 mins.
Cook time: 00 hrs. 00 mins.
Total time: 0 hrs. 15 mins.

Kamado Baked Pita Bread

Yum
In preparation for the next meal i was thinking of making on the grill i decided id go the whole hog and actually make the pita bread i was planning to use instead of buying it from the shop, and as we all know home made stuff always tastes better than the mass produced stuff the stores stock and is so satisfying to know you did it yourself.

So down to the usual drill
i got all the ingrediants together
Ingredients weighed out

  •  500g Strong white bread flour
  • 1 tsp of salt
  • 6 grams of instant yeast
  • 350ml warm water
Once together i sifted the flour, salt and yeast into a bowl and made a well in the middle to pour the water into, then added the water and proceeded to stir untill it all came together into a dough 
Stired together into a dough

Once its all together i turned it out onto a clean surface and kneaded for approx 5mins untill it became smooth, i then added a dash of olive oil to a clean bowl (to stop the dough sticking) and put the dough into it and covered with cling film and set aside to rise while i lit the kamado and got it upto temp
Dough waiting to rise

I set up the grill as i would for a pizza cook
Same setup as a pizza cook
which is the heat deflector in the raised position with the grill on top and the ceramic pizza stone on top of that and aimed for a temp between 315-375c (600-700f approx)

After about an hour the temp had been reached and held for a while to ensure the ceramics were heat soaked so it was time to go back to the dough
Well risen 
As you can see the dough was well risen and ready to go.
I turned it out onto a floured surface and devided it into 11 decent sized pieces and rolled each one out into your usual pita bread type oval shape 
Uncooked pita's 
it was just a rough shape as i wasnt looking to win any competitions with them

Next was to cook them, at this temp they only take between 1 and 2 minutes to cook (one of the reasons i have no pictures of this part) and you know they are ready when the "puff" up like you would imagine a blowfish to do. 
I managed to get 2 to 3 on the pizza stone depending on the size of them and of the odd few that didnt seem to be browned enough on top i simple flipped them and continued to cook them for another 30 seconds.
When done i used my pizza peel to remove them and covered with a dry clean dish towel to cool
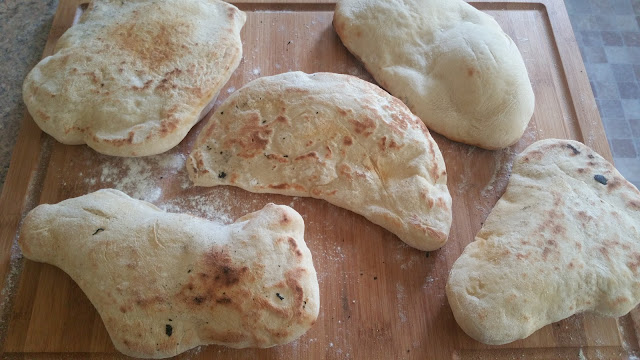
Finished!
 When cooled they were put into an airtight container ready for my next meal!


Smoked Chocolate Brownies

Yum
This is another example of how versatile kamado grills are to use.

So the kids wanted some chocolate brownies and i wanted to cook something on the grill so combining the two with this quick and easy recipe kept the whole family happy!

I started out by getting all the ingredients needed together and weighing them out

The ingrediants

  • 125g butter
  • 250g 70% coco chocolate chips
  • 240g caster sugar
  • 25g plain flour
  • 50g ground almonds
  • 4 eggs


I then proceeded to light the grill, and set up for an indirect cook, then i added the chocolate chips and the butter to the pan and put it into the grill to melt while warming to around 150c (300f approx)
Chocolate and butter on the grill to melt whilst its warming

Once melted i mixed the two together gently and left to cool 
Melted chocolate and butter mixture

whilst the chocolate and butter mixture was cooling i added the eggs and sugar to a large bowl and whisked them together untill it was a thick, creamy consistency


The eggs and sugar should go from this...

...to this

Next sift the flour into a bowl and stir in the ground almonds making sure its well mixed
Flour and almond mixture

Next is to mix together the chocolate/butter and the eggs/sugar then fold the flour/almonds thru the combined mixture so you have something resembling the below picture
Everything mixed together

The final step before cooking is to grease a tray and pour the mixture in
I used a disposable tray approx 30 x 18cm 

Any baking tray of a suitable size is fine but i used the disposable one to make the removal of the brownies easier as i could simply cut the tray sides 

This was added to the grill and cooked at the aforementioned temp of 150c (300f) for around 30 to 40 mins

Unfortunately the weather didn't hold out and the rain came down like there was no tomorrow so i didn't manage to get any more pictures of them on the grill
But as you can see from the picture below when cooked the brownies are coming away from the edges and the top is just firm which is when they should be removed and left to cool
Brownies cooling 


Once cooled the brownies should have firmed up more and be easier to cut up whilst still being nice and moist in the centre as shown below


Cut in to squares and still moist in the middle

Easy Kamado Pizza's

Yum
The weekend is the time when i get to cook on my kamado joe due to working all week but this weekend i had to work on Saturday morning too, so i had to find something i could cook quickly and easily during the afternoon/evening after i'd got home and the quickest thing i could think of was pizza!

Now i'm not talking about heating up a shop bought affair on the grill this is take out quality, homemade from scratch pizza, and from start to finish its done in almost the same time it would take for your delivery order to arrive!

Pizza is truly a hot and fast cook so its essential that the kamado joe is cleaned out to ensure no ash or small pieces of lump from previous cooks are blocking any of the air flow, also its best to use fresh lump in my opinion but as i'm cleaning the kamado out i put the old lump in my chimney starter so not to waste any then light it
By the time i've cleaned the kamado out and refilled with fresh charcoal the chimney starter is ready to be added to get everything heating up

The set up for pizza is different and requires a good quality ceramic pizza stone too, i use kamado joe's official one but there are many other brands available that will work just as well.

The way i set this up is to have the heat deflector in the upper position, then i add the grill grate, then i place the pizza stone on top of the grill so it creates a sort of air gap between the heat deflector and the pizza stone
My Pizza Setup

The above picture shows my setup with the grill grate between the heat deflector and the pizza stone
Now you just close the lid and open both the top and bottom vent all the way to make the kamado get really hot, i was personally aiming for 350-400c (650-750f approx) and then hold that temperature for a while to let all the ceramics soak in the heat.
Now some people cook pizzas hotter and some cooler each has its pros and cons but i've found the above temps to be the sweet spot for myself

Now the grill is heating its time to make the pizza bases 
I first measured out my ingredients 
Pizza base Ingredients 
  • 1 tsp of instant yeast
  • 1 tsp salt
  • 300g of strong bread flour
  • 1 tbsp of olive oil
  • 200ml of warm water

First with the flour already in the bowl you add the yeast and the salt and stir it to ensure its mixed in well
Next make a well in the centre and pour in the water and the olive oil and stir with a wooden spoon untill it all comes together to form a wet dough
Lightly flour a surface for kneading on and turn out the dough onto it as shown below
Pizza Dough Ready For Kneading

Now knead the dough for around 5 minutes until it becomes smooth then cover with a clean dry towel and set aside while we make the pizza sauce
I was making 3 pizzas so i repeated the above again but doubled the ingredients then simply halved the dough at this stage 

The sauce is simple and so easy to make, i again got my ingredients together
Pizza Sauce Ingredients 

  • 1 500g carton of tomato passata
  • 50g double concentrated tomato puree 
  • 1 tbsp dried oregano
  • 1 tbsp italian seasoning 
  • 1tsp of paprika
  • 1 tsp sugar
  • 2 cloves of garlic

With the passata in a container that will accept a lid, mince the garlic cloves then add them and the rest of the ingredients to the passata and mix well to make sure its all combined, pop on the lid and set it aside and your done! easy eh?
This will be more than you need for one pizza (it was more than i used for 3!) but keeps well in the fridge (hence the container with a lid)

Now check the grill, by this point it should be near our target temp of 350-400c (650-750f approx), so start shutting down the top vent to hold it there (i leave the bottom vent wide open for the entirety of this cook) if its not there yet then let it rise before closing the vent, if its over its no big deal we are shooting for a high heat cook so just close the top vent a little and the temp will fall

We need to hold it at this temp while we finish the pizza as its the absorbed heat in the ceramics that cooks the pizza here not the actual fire, the heat of the pizza stone is what cooks the base and the absorbed/reflective heat of the dome lid is what cooks the topping

Now its time to make the pizza up 
Get you pizza dough ball and on a floured surface give it a quick knead for a minute then roll out into a rough pizza shape and turn up the edges as shown below
Pizza Dough Rolled Out With Edges Turned Up

The pizza peel id ordered online hadn't arrived yet (thank you Mr Delivery man) so a little trick to help with transferring the pizza to the hot stone is to place the base on some baking paper which is placed on a large plate before adding the toppings then the baking paper is used to slide the pizza on to the stone and will simply pull out from under the pizza once the base is cooked

Now for the toppings 
Add some of the pizza sauce to the base and spread it around with the back of a spoon, you want a thin layer from edge to edge then sprinkle a layer of grated mozzarella 
Now for the rest ill leave that up to you, the world really is your oyster with pizza, you want veg? mushrooms, onions and peppers are all great
After a meat fix? pepperoni, sausage meat, bacon or even pulled pork from a previous cook all work very well
The best piece of advice i can give when it comes to the toppings (especially if your new to pizzas on a bbq) is to not over load the base, if you do you end up with a burnt base with toppings that still need to be heated thru

Now its time to cook your creations, take them out to your grill and get your self ready for some conveyor belt action, as i said before at this temperature the pizzas cook quick!

With that being said i think its only prudent to add a little warning here, The kamado is obviously Very Hot, so when opening the lid at these kind of temperatures the best practice is to open the lid slowly at first, open the lid an inch or two and hold it for a few seconds to allow some of the super heated air to escape then open fully and add the pizza, doing this, if nothing else saves you from instntly removing all the hair on your arms and possibly face quicker than you can say That's amore

I generally put a pizza on the stone then shut the lid and leave it for around 5 minuites 
Heres a picture showing my pizzas on the grill


At the 4 to 5 minute mark lift the lid and check on you pizza, depending on the thickness of your base and the amount of toppings you've added it should be about ready the if the cheese is melted and bubbling its a good sign but i like to lift the edge of my pizza with a spatula to double check the underneath of the base looks nice and browned, if not close the lid and give it another minute, at these temperatures its really all it needs

Here's a pick showing my finished pizzas
3 tasty finished pizzas 

The top pizza took the longest to cook as the base had risen a little more than the other two while resting, but at 7 minutes its nothing to complain about!

So what do you think? any amazing topping combinations i should consider for my next venture into the world of pizza? 
Feel free to let me know in the comments
See you next time